Je poursuis l’exploration du GitOps et comme Ignite propose un mode
GitOps voyons comment fonctionne-t-il. Weave Ignite est un gestionnaire de
machines virtuelles (VM) open source intégrant le gestionnaire de Micro-VM
Firecracker mis au point par AWS.
Introdction
Ignite apporte les outils pour faciliter l’utilisation de FireCracker et
peut être une solution alternative à des produits comme Vagrant
d’HashiCorp.
FireCracker, pourquoi est-il si rapide ?
Firecracker est une alternative à QEMU, écrit en Rust et n’intègre que le strict minimum pour faire tourner des microVM sur KVM. Résultat, il réduit considérablement l’empreinte mémoire utilisée par une VM(5MB), pour optimiser le temps de démarrage à 125 ms tout en augmentant la sécurité.
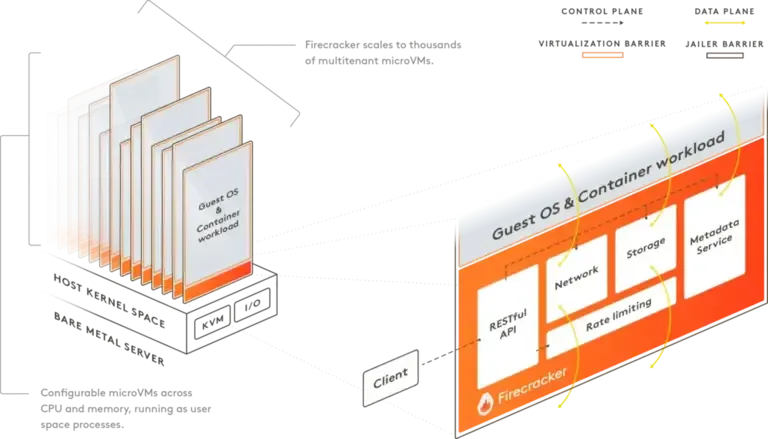
Il ne supporte que les 4 drivers suivant :
- virtio-block
- virtio-net
- une console série
- une fonction utilisée pour arrêter une microVM (reboot)
Installation d’Ignite
Je vous propose de créer une VM avec Vagrant et de tout installer avec Ansible.
Vagrant.configure("2") do |config|
  config.vm.box = "generic/oracle8"
  config.vm.provider "libvirt" do |libvirt|    libvirt.cpus = "3"    libvirt.memory = "2048"    libvirt.nested = true    libvirt.cpu_mode = "host-model"  end  config.vm.synced_folder '.', '/vagrant', disabled: true
  config.vm.define "ignite" do |ignite|
    ignite.vm.network :private_network, ip: "192.168.3.11"    ignite.vm.hostname = "ignition"    ignite.vm.provision "ansible" do |a|      a.verbose = "v"      a.playbook = "provision-playbook.yml"    end  endend
Le playbook Ansible :
---- hosts: all  gather_facts: true  become: true
  vars:    cni_version: "v0.9.1"    ignite_version: "v0.10.0"    footloose_version: "0.6.0"
  tasks:    - name: Replace a localhost entry with our own      ansible.builtin.lineinfile:        path: /etc/hosts        regexp: '^127\.0\.0\.1'        line: 127.0.0.1 localhost        owner: root        group: root        mode: '0644'
    - name: Allow password authentication      ansible.builtin.lineinfile:        path: /etc/ssh/sshd_config        regexp: "^PasswordAuthentication"        line: "PasswordAuthentication yes"        state: present      notify: restart sshd
    - name: Set authorized key took from file      ansible.builtin.authorized_key:        user: vagrant        state: present        key: "{{ lookup('file', '/home/vagrant/.ssh/id_ed25519.pub') }}"
    - name: Add Docker repo      get_url:        url: https://download.docker.com/linux/centos/docker-ce.repo        dest: /etc/yum.repos.d/docer-ce.repo
    - name: Install Dependencies      ansible.builtin.package:        name:          - e2fsprogs          - openssh-clients          - git          - containerd.io          - oracle-epel-release-el8          - unzip          - virt-install          - virt-viewer          - libvirt          - qemu-kvm          - gcc          - libvirt-devel          - curl          - cmake          - jq
    - name: Create Folder for CNI      ansible.builtin.file:        name: /opt/cni/bin        state: directory        mode: 0755
    - name: Install CNI      ansible.builtin.unarchive:        src: "https://github.com/containernetworking/plugins/releases/download/{{ cni_version }}/cni-plugins-linux-amd64-{{ cni_version }}.tgz"        dest: /opt/cni/bin        remote_src: true
    - name: Install ignite      ansible.builtin.get_url:        url: https://github.com/weaveworks/ignite/releases/download/{{ ignite_version }}/{{ item }}-amd64        dest: /usr/bin/{{ item }}        mode: 0755      with_items:        - "ignite"        - "ignited"
    - name: Install Footloose      ansible.builtin.get_url:        url: https://github.com/weaveworks/footloose/releases/download/{{ footloose_version }}/footloose-{{ footloose_version }}-linux-x86_64        dest: /usr/bin/footloose        mode: 0755
    - name: Start Services      ansible.builtin.service:        name: containerd        state: started        enabled: true      with_items:        - containerd        - libvirtd

  handlers:    - name: restart sshd      service:        name: sshd        state: restarted
Pour le moment, il est fonctionnel, mais je vais le compléter certainement pour
intégrer par exemple footloose, pas le film, pour créer des clusters plus
rapidement.
Nota si vous utilisez ce VagrantFile depuis une VM il faudra bien vérifier que la virtualisation imbriquée est activé.
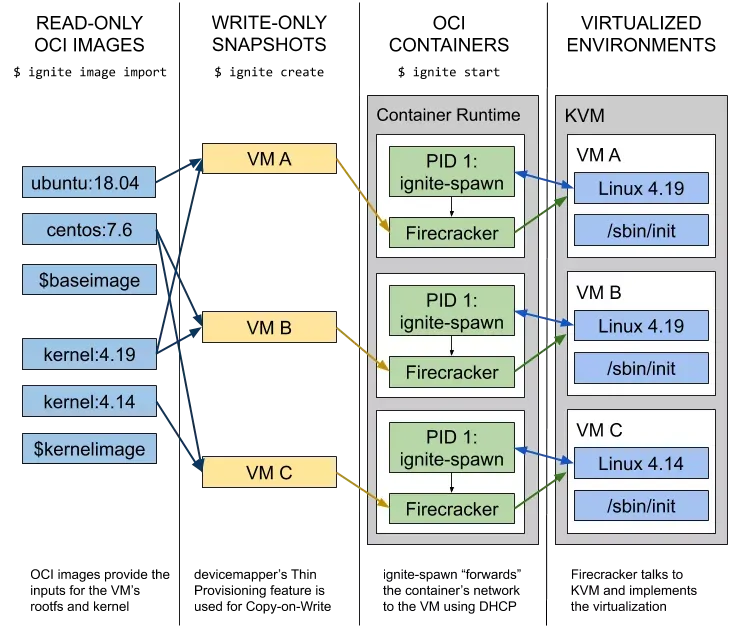
Création d’une Micro-VM
Ignite utilise des images OCI pour faire tourner nos micros-VM. Il faut qu’elle utilise un noyau fourni par WeaveWorks pour fonctionner et qu’elle exécute /sbin/init avec le PID 1.
WeaveWorks fourni des images avec comme base :
- Ubuntu : weaveworks/ignite-ubuntu
- Centos 7 : weaveworks/ignite-centos
- Amazon Linux 2 : weaveworks/ignite-amazonlinux
- Alpine Linux : weaveworks/ignite-alpine
Pour le moment la CLI ignite demande d’utiliser le compte root, mais il est prévu de changer ce comportement dans les prochaines versions. Si vous connaissez les commandes Docker vous ne serez pas perdu, ignite reprend les mêmes. Ainsi, pour créer une micro VM il suffit d’utiliser la commande suivante :
sudo ignite create weaveworks/ignite-ubuntu \  --name my-vm \  --cpus 2 \  --memory 1GB \  --size 6GB \  --ssh
ignite ps -aVM ID                   IMAGE                           KERNEL                                  SIZE    CPUS    MEMORY          CREATED STATUS  IPS     PORTS   NAME804276f0754f603c        weaveworks/ignite-ubuntu:latest weaveworks/ignite-kernel:5.10.51        6.0 GB  2       1024.0 MB       55s ago Stopped                 my-vm
Notre VM a bien été créé, mais elle est au status Stopped. Pour la démarrer :
sudo ignite start my-vmINFO[0000] Networking is handled by "cni"INFO[0000] Started Firecracker VM "804276f0754f603c" in a container with ID "ignite-804276f0754f603c"INFO[0001] Waiting for the ssh daemon within the VM to start...Elle démarre en 2 secondes. Pour se connecter dessus :
sudo ignite ssh my-vmWelcome to Ubuntu 20.04.3 LTS (GNU/Linux 5.10.51 x86_64)
 * Documentation:  https://help.ubuntu.com * Management:     https://landscape.canonical.com * Support:        https://ubuntu.com/advantage
This system has been minimized by removing packages and content that arenot required on a system that users do not log into.
To restore this content, you can run the 'unminimize' command.
The programs included with the Ubuntu system are free software;the exact distribution terms for each program are described in theindividual files in /usr/share/doc/*/copyright.
Ubuntu comes with ABSOLUTELY NO WARRANTY, to the extent permitted byapplicable law.
root@804276f0754f603c:~#
Il est possible de combiner toutes ces commandes en une seule avec run :
sudo ignite run weaveworks/ignite-ubuntu \  --name another-vm \  --cpus 2 \  --memory 1GB \  --size 6GB \  --ssh \  --interactive
...[  OK  ] Finished Load/Save Random Seed.[  OK  ] Started OpenBSD Secure Shell server.[  OK  ] Reached target Multi-User System.[  OK  ] Reached target Graphical Interface.         Starting Update UTMP about System Runlevel Changes...[  OK  ] Finished Update UTMP about System Runlevel Changes.
Ubuntu 20.04.3 LTS ad9a5d923d920354 ttyS0ad9a5d923d920354 login:
Les user/mot de passe par défaut sont root/root. Pour se déconnecter il faut utiliser CTRL + P + Q
Pour stopper une VM, il est possible d’utiliser la commande reboot ou les commandes suivantes :
sudo ignite stop my-vmsudo ignite kill my-vmPour la détruire :
sudo ignite rm my-vmConstruire des images Ignite compatible
Il est possible de créer d’autres images en utilisant les DockerFile fourni dans le répertoire images du repo d’ignite
git clone git@github.com:weaveworks/ignite.gitcd ignite/imagesmake build-ubuntu
docker imagesREPOSITORY                                      TAG                                IMAGE ID       CREATED              SIZEweaveworks/ignite-ubuntu                        20.04-amd64                        7a6d5d91feb0   33 seconds ago       229MBweaveworks/ignite-ubuntu                        20.04-v0.10.0-28-g2bbe0d12-amd64   7a6d5d91feb0   33 seconds ago       229MBweaveworks/ignite-ubuntu                        latest-amd64                       7a6d5d91feb0   33 seconds ago       229MBweaveworks/ignite-ubuntu                        20.04-arm64                        32ec7d853fa5   About a minute ago   224MBweaveworks/ignite-ubuntu                        20.04-v0.10.0-28-g2bbe0d12-arm64   32ec7d853fa5   About a minute ago   224MBweaveworks/ignite-ubuntu                        latest-arm64                       32ec7d853fa5   About a minute ago   224MBweaveworks/ignite-ubuntu                        18.04-amd64                        ae51cc5c52d9   3 minutes ago        205MBweaveworks/ignite-ubuntu                        18.04-v0.10.0-28-g2bbe0d12-amd64   ae51cc5c52d9   3 minutes ago        205MBweaveworks/ignite-ubuntu                        18.04-arm64                        9fe43695ca26   4 minutes ago        198MBweaveworks/ignite-ubuntu                        18.04-v0.10.0-28-g2bbe0d12-arm64   9fe43695ca26   4 minutes ago        198MBweaveworks/ignite-ubuntu                        16.04                              3ac82ac1ddf0   6 minutes ago        216MBweaveworks/ignite-ubuntu                        16.04-v0.10.0-28-g2bbe0d12         3ac82ac1ddf0   6 minutes ago        216MB
make build-alpine
docker imagesREPOSITORY                  TAG                           IMAGE ID       CREATED         SIZEweaveworks/ignite-alpine    latest                        2e577ee7c1fd   7 seconds ago   27.2MBweaveworks/ignite-alpine    latest-v0.10.0-28-g2bbe0d12   2e577ee7c1fd   7 seconds ago   27.2MB
On peut créer des images Ubuntu, Centos 8, Alma Linux, Alpine, OpenSuse, Rocky Linux, k3s, kubeadm, Amazon Linux
Pour les utiliser il faudra les importer avec la commande **ignite image import \<identifier\>**
ignite image import weaveworks/ignite-alpine --runtime docker
ignite imagesIMAGE ID                NAME                            CREATED SIZE8849a4f9c3b3ddc4        weaveworks/ignite-alpine:latest 21h     32.7 MBe40670d51dbf5c81        weaveworks/ignite-ubuntu:latest 21h     243.3 MB
Exécuter des commandes :
Il existe une commande pour lancer des commandes dans une VM :
sudo ignite exec code-vm -- "apt update && apt install -y sshfs"Copier des fichiers
Bien sûr, par sécurité, je vous déconseille de déposer dans vos images les secrets. Pour les intégrer il faut utiliser l’option -f strings.
ignite run weaveworks/ignite-ubuntu   --name my-vm   --cpus 2   --memory 1GB   --size 6GB --ssh --copy-files /home/vagrant/toto /toto
ignite exec my-vm 'ls -al /toto'-rw-r--r--. 1 root root 0 Dec 12 10:03 /toto
Si elle est déjà instanciée on peut utiliser la commande cp:
ignite cp localfile.txt my-vm:remotefile.txtOn peut le faire aussi dans l’autre direction
Monter des volumes
Sans volumes pas de persistance. Heureusement, c’est pris en charge. Il faut créer dans un premier temps créer le volume :
sudo sudd if=/dev/zero of=/tmp/loopbackfile.img bs=100M count=1010+0 records in10+0 records out1048576000 bytes (1.0 GB, 1000 MiB) copied, 2.75182 s, 381 MB/s
losetup -fP /tmp/loopbackfile.img
losetup -a/dev/loop1: [64512]:75340 (/var/lib/firecracker/vm/84e8dd00e273a4c2/overlay.dm)/dev/loop2: [64512]:201395847 (/tmp/loopbackfile.img)/dev/loop0: [64512]:2030230 (/var/lib/firecracker/image/ddf327a54d780721/image.ext4)
mkfs.ext4 /tmp/loopbackfile.imgmke2fs 1.45.6 (20-Mar-2020)Discarding device blocks: doneCreating filesystem with 256000 4k blocks and 64000 inodesFilesystem UUID: 15e860b7-7c5a-4424-9d3a-5ce1b8bfdb9eSuperblock backups stored on blocks:        32768, 98304, 163840, 229376
Allocating group tables: doneWriting inode tables: doneCreating journal (4096 blocks): doneWriting superblocks and filesystem accounting information: done
Maintenant que nous avons notre volume prêt ajoutons un fichier dedans :
mkdir /loopfsmount -o loop /dev/loop2 /loopfstouch /loopfs/totoumount /loopfsMaintenant lançons une vm en montant le volume et vérifions que le fichier toto s’y trouve :
ignite create weaveworks/ignite-ubuntu --name my-vm   --cpus 2   --memory 1GB   --size 6GB --ssh --volumes=/dev/loop2:/my_volINFO[0001] Created VM with ID "410017cc82044c19" and name "my-vm"
ignite start my-vmINFO[0000] Networking is handled by "cni"INFO[0000] Started Firecracker VM "410017cc82044c19" in a container with ID "ignite-410017cc82044c19"INFO[0001] Waiting for the ssh daemon within the VM to start...
ignite ssh my-vmWelcome to Ubuntu 20.04.3 LTS (GNU/Linux 5.10.51 x86_64)
cd /my_vollslost+found  toto
Ca fonctionne !
Partage de ports
On utilise l’option ports :
ignite run weaveworks/ignite-ubuntu   --name my-vm   --cpus 2   --memory 1GB   --size 6GB --ssh --ports 80:80ignite psVM ID                   IMAGE                           KERNEL                                  SIZE    CPUS    MEMORY          CREATED         STATUS          IPS             PORTS                   NAMEeb8cb193c8590bd4        weaveworks/ignite-ubuntu:latest weaveworks/ignite-kernel:5.10.51        6.0 GB  2       1024.0 MB       3m57s ago       Up 3m57s        10.61.0.13      0.0.0.0:80->80/tcp      my-vm
ignite exec my-vm `apt update && apt install -y nginx && systemctl enable nginx --now'
curl http://10.61.0.13
<!DOCTYPE html><html><head><title>Welcome to nginx!</title><style>    body {        width: 35em;        margin: 0 auto;        font-family: Tahoma, Verdana, Arial, sans-serif;    }</style></head><body><h1>Welcome to nginx!</h1><p>If you see this page, the nginx web server is successfully installed andworking. Further configuration is required.</p>
<p>For online documentation and support please refer to<a href="http://nginx.org/">nginx.org</a>.<br/>Commercial support is available at<a href="http://nginx.com/">nginx.com</a>.</p>
<p><em>Thank you for using nginx.</em></p></body></html>
Utiliser Ansible pour configurer les micro-vm
Commençons par installer ansible :
dnf install ansible
Installed:  ansible-2.9.27-1.el8.noarch python3-babel-2.5.1-7.el8.noarch python3-jinja2-2.10.1-3.el8.noarch python3-jmespath-0.9.0-11.el8.noarch python3-markupsafe-0.23-19.el8.x86_64 python3-pytz-2017.2-9.el8.noarch sshpass-1.06-9.el8.x86_64
Générons une clé ssh:
[root@ignition eb8cb193c8590bd4]# ssh-keygen -t ed25519 -b 2048Generating public/private ed25519 key pair.Enter file in which to save the key (/root/.ssh/id_ed25519):Enter passphrase (empty for no passphrase):Enter same passphrase again:Your identification has been saved in /root/.ssh/id_ed25519.Your public key has been saved in /root/.ssh/id_ed25519.pub....+----[SHA256]-----+Il faut créer une VM en utilisant cette clé :
ignite run weaveworks/ignite-ubuntu --name my-vm --cpus 2 --memory 1GB --size 6GB --ssh=/root/.ssh/id_ed25519.pubMaintenant contrôlons que l’on peut atteindre la VM :
ansible -m ping -i 10.61.0.13, all10.61.0.15 | SUCCESS => { "ansible_facts": { "discovered_interpreter_python": "/usr/bin/python3" }, "changed": false, "ping": "pong"}Prometheus
Et oui même Prometheus est intégré. Tous les VM expose des métriques.
VM_NAME="my-vm"VM_ID=$(ignite inspect vm ${VM_NAME} | jq -r .metadata.uid)curl --unix-socket /var/lib/firecracker/vm/${VM_ID}/prometheus.sock http:/metrics
# HELP go_build_info Build information about the main Go module.# TYPE go_build_info gaugego_build_info{checksum="",path="github.com/weaveworks/ignite",version="(devel)"} 1# HELP go_gc_duration_seconds A summary of the pause duration of garbage collection cycles.# TYPE go_gc_duration_seconds summarygo_gc_duration_seconds{quantile="0"} 0.000199942go_gc_duration_seconds{quantile="0.25"} 0.000427605go_gc_duration_seconds{quantile="0.5"} 0.0006698go_gc_duration_seconds{quantile="0.75"} 0.000922241go_gc_duration_seconds{quantile="1"} 0.001635991go_gc_duration_seconds_sum 0.005484029go_gc_duration_seconds_count 8# HELP go_goroutines Number of goroutines that currently exist.# TYPE go_goroutines gauge
Et le mode GitOps
Pour ceux qui ne connaissent pas encore ce qu’est le GitOps je vous renvoie à ce billet.
Ignite peut fonctionner dans le mode GitOps, mais il faudra créer dans un premier temps un repo git vide.
sudo ignited gitops https://gitlab.com/Bob74/test-ignited.git
INFO[0000] Starting GitOps loop for repo at "https://gitlab.com/Bob74/test-ignited.git"INFO[0000] Whenever changes are pushed to the target branch, Ignite will apply the desired state locallyINFO[0000] Initializing the Git repo...INFO[0000] Running in read-only mode, won't write status back to the repoINFO[0000] Starting the checkout loop...INFO[0000] Starting to clone the repository https://gitlab.com/Bob74/test-ignited.git with timeout 1m0sINFO[0000] New commit observed on branch "master": 45ab4b3bbd88566603082dfefcd82f7d5e5d5cf2. User initiated: true
Maintenant créons un fichier déclarant une VM my-vm.yaml:
apiVersion: ignite.weave.works/v1alpha4kind: VMmetadata: name: my-vm uid: 599615df99804ae8spec: image: oci: weaveworks/ignite-ubuntu cpus: 1 diskSize: 3GB memory: 800MB ssh: truestatus: running: trueIgnited lance des git pull toutes les minutes. Au bout de quelques secondes, vous devriez voir les choses bouger.
sudo ignite ps
VM ID                   IMAGE                           KERNEL                                  SIZE    CPUS    MEMORY          CREATED STATUS          IPS     PORTS   NAME599615df99804ae8        weaveworks/ignite-ubuntu:latest weaveworks/ignite-kernel:5.10.51        3.0 GB  1       800.0 MB        58s ago Up <nil>                        my-vm
Cool ! Elle a été créée.
REMARQUE: Le mode HTTPS ne préserve pas les informations d’authentification pour ignited. Pour pousser les modifications, vous devez configurer l’authentification SSH et utiliser l’URL de clonage SSH !
Voici toutes les déclarations qui peuvent être utilisé.
apiVersion: ignite.weave.works/v1alpha4kind: VMmetadata:  # Automatically set when the object is created  created: [RFC3339-formatted date]  # Required, the name of the VM  name: [string]  # Optional, autogenerated if not specified  uid: [16-char hex UID]  # Optional, a string-string map with label keys and values  labels:    foo: bar  # Optional, a string-string map with annotation keys and values  annotations:    foo: barspec:  # Optional, how many vCPUs should be allocated for the VM  # Default: 1  cpus: [uint64]  # Optional, how much RAM should be allocated for the VM  # Default: 512MB  memory: [size]  # Optional, how much free writable space the VM should have at runtime  # Default: 4GB  diskSize: [size]
  image:    # Required, what OCI image to use as the VM's rootfs    # For example: weaveworks/ignite-ubuntu:latest    oci: [OCI image reference]  kernel:    # Optional, the kernel command line for the VM    # Default: "console=ttyS0 reboot=k panic=1 pci=off ip=dhcp"    cmdLine: [string]    # Required, what OCI image to get the kernel binary (and optionally modules) from    # Default: weaveworks/ignite-kernel:5.10.51    oci:  [OCI image reference]  sandbox:    # Optional, what OCI image to use as the ignite sandbox.    # Default: weaveworks/ignite    oci: [OCI image reference]
  network:    # Optional, an array of port mappings that map ports bound to the VM to the host    # Default: unset, no port mappings    ports:    # This example maps UDP port 0.0.0.0:6443 inside the VM to 10.0.0.2:443 on the physical host    - hostPort: 433      vmPort: 6443      # Optional, specify an address to bind to on the host      # Default: 0.0.0.0, any address      bindAddress: 10.0.0.2      # Optional, specify a protocol for the port mapping (tcp or udp)      # Default: tcp      protocol: udp
  storage:    # Optional, an array of mountPath and name pairs,    # set the mount points for named volumes inside the VM.    # Names must match configured named volumes.    # Default: unset, no mount points    volumeMounts:    - mountPath: /mnt      name: volume0    # Optional, an array of blockDevice and name pairs,    # expose block devices on the host inside the VM.    # The blockDevice path must point to a block device formatted    # with a filesystem providing an UUID (such as ext4 or xfs).    # Default: unset, no volume forwarding    volumes:    - blockDevice:        path: /dev/sdb1      name: volume0
  # Optional, an array of files/directories to copy into the VM on creation  # Default: unset, nothing will be copied  copyFiles:  # This example copies a Kubernetes KubeConfig file from /etc/kubernetes/admin.conf  # on the host to /home/user/.kube/config inside the VM  - hostPath: /etc/kubernetes/admin.conf    vmPath: /home/user/.kube/config
  # Optional, provides automation to easily access your VM with the "ignite ssh" command  # If "ssh: true" is set, Ignite will generate an SSH key and copy the  # public key into the VM. This allows for automatic "ignite ssh" logins.  # Alternatively: specify a path to a public key to put in /root/.ssh/authorized_keys in the VM.  # Default: unset, no actions regarding SSH automation  ssh: [true, or public key path]
Il est possible créer un service pour contrôler ignited. Pour cela créer un fichier dans le répetoire /etc/systemd/system/ignite.service avec ce contenu :
[Unit]Description=Ignite (Firecracker) micro-VM launch daemonDocumentation=https://ignite.readthedocs.io/BindsTo=containerd.serviceAfter=network-online.target firewalld.service containerd.serviceWants=network-online.target containerd.service
[Service]Type=simple# the default is not to use systemd for cgroups because the delegate issues still# exists and systemd currently does not support the cgroup feature set required# for micro-vm run by Ignite (Firecracker)ExecStart=/usr/bin/ignited daemonExecReload=/bin/kill -s HUP $MAINPIDTimeoutSec=0RestartSec=2Restart=always
# Note that StartLimit* options were moved from "Service" to "Unit" in systemd 229.# Both the old, and new location are accepted by systemd 229 and up, so using the old location# to make them work for either version of systemd.StartLimitBurst=3
# Note that StartLimitInterval was renamed to StartLimitIntervalSec in systemd 230.# Both the old, and new name are accepted by systemd 230 and up, so using the old name to make# this option work for either version of systemd.StartLimitInterval=60s
# Having non-zero Limit*s causes performance problems due to accounting overhead# in the kernel. We recommend using cgroups to do micro-vm-local accounting.LimitNOFILE=infinityLimitNPROC=infinityLimitCORE=infinity
# Comment TasksMax if your systemd version does not support it.# Only systemd 226 and above support this option.TasksMax=infinity
# set delegate yes so that systemd does not reset the cgroups of# Ignite (Firecracker) micro-vmDelegate=yes
# kill only the ignite process, not all processes in the cgroupKillMode=process
[Install]WantedBy=multi-user.target
Maintenant chargeons le service et activons le :
systemctl daemon-reloadsystemctl enable ignite --nowsystemctl status ignite● ignite.service - Ignite (Firecracker) micro-VM launch daemon   Loaded: loaded (/etc/systemd/system/ignite.service; enabled; vendor preset: disabled)   Active: active (running) since Sun 2021-12-12 11:01:30 UTC; 1min 39s ago     Docs: https://ignite.readthedocs.io/ Main PID: 22834 (ignited)    Tasks: 11   Memory: 17.4M   CGroup: /system.slice/ignite.service           └─22834 /usr/bin/ignited daemon
Dec 12 11:01:30 ignition systemd[1]: Started Ignite (Firecracker) micro-VM launch daemon.Dec 12 11:01:30 ignition ignited[22834]: time="2021-12-12T11:01:30Z" level=info msg="Starting reconciliation loop..."
Maintenant il suffit de déposer un manifest dans le dossier /etc/firecracker/manifests avec le nom my-vm.yaml :
apiVersion: ignite.weave.works/v1alpha4kind: VMmetadata: name: my-vm uid: 599615df99804ae8spec: image: oci: weaveworks/ignite-ubuntu cpus: 1 diskSize: 4GB memory: 800MB ssh: truestatus: running: trueContrôlons que tout fonctionne :
ignite ps
VM ID                   IMAGE                           KERNEL                                  SIZE    CPUS    MEMORY          CREATED         STATUS          IPS             PORTS   NAME599615df99804ae8        weaveworks/ignite-ubuntu:latest weaveworks/ignite-kernel:5.10.51        4.0 GB  1       800.0 MB        3m59s ago       Up 3m57s        10.61.0.16              my-vm
Conclusion
Il ne reste plus qu’à tester tout cela, en construisant une stack complète. Il suffit de créer des images avec vos applications en partant des images Weaworks/ignite-*. Je vais remplacer vagrant par ignite pour mon environnement de dev, car les VM sont disponible très rapidement.