

You have just fixed a typo in your README. You push the commit. GitHub Actions starts, and you wait 4 minutes while npm downloads 847 packages for the 50th time this week.
Frustrating, isn't it?
This guide explains how to divide that time by 10 thanks to the GitHub Actions cache. No need to be an expert: if you can write a basic workflow, you will be using the cache within 10 minutes.
What you will learn
- Enable the dependency cache in one line with the
setup-*actions - Understand the cache keys and the role of the lockfile hash
- Configure
actions/cacheto cache a build (Next.js, Webpack and so on) - Choose what to cache, and what you must never cache
- Avoid cache poisoning and diagnose a cache that is never reused
The problem: why your workflows are slow
Let us look at what happens when you run a workflow with no cache:
Commit #1 (Monday 9:00)├── Checkout of the code .......... 2s├── npm ci (download) ............. 47s  <- Internet├── npm run build ................. 35s└── npm test ...................... 12s    Total: 96 seconds
Commit #2 (Monday 9:15)├── Checkout of the code .......... 2s├── npm ci (download) ............. 47s  <- Internet again, the same packages!├── npm run build ................. 35s└── npm test ...................... 12s    Total: 96 seconds
Between those two commits, nothing changed in the dependencies. Yet GitHub downloads the same 847 packages, from the same npm servers, for the second time in 15 minutes.
Over a week with 50 commits, that is 39 minutes lost downloading the same files.
The solution: keeping the files around
What it gives you in practice
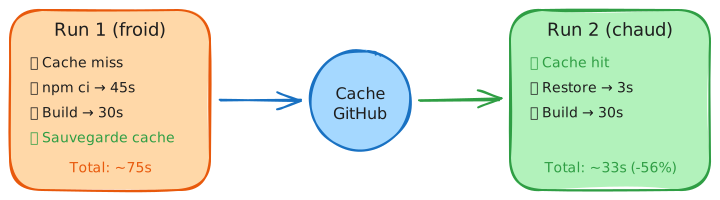
Commit #1 (first run, empty cache)├── Checkout of the code .......... 2s├── Cache restore ................. 0s   <- No cache yet├── npm ci (download) ............. 47s  <- Internet├── Cache save .................... 5s   <- We fill the fridge├── npm run build ................. 35s└── npm test ...................... 12s    Total: 101 seconds
Commit #2 (cache available)├── Checkout of the code .......... 2s├── Cache restore ................. 3s <- The fridge is full!├── npm ci ........................ 2s <- Nothing to download├── npm run build ................. 35s└── npm test ...................... 12s Total: 54 secondsResult: 47 seconds saved on every commit. Over 50 commits a week, that is 39 minutes recovered.
Enabling the cache: the simplest method
Good news: enabling the cache takes a single line.
Before (no cache)
Here is the starting workflow, with no caching at all. Spot the npm ci step:
that is the one downloading everything again on every run. The permissions:
block and persist-credentials: false are already there; they change nothing for
the speed, but they remain the security baseline this guide never questions.
name: CIon: [push]
permissions: {}
jobs:  build:    runs-on: ubuntu-24.04    permissions:      contents: read    steps:      - uses: actions/checkout@3d3c42e5aac5ba805825da76410c181273ba90b1 # v7.0.1        with:          persist-credentials: false
      - uses: actions/setup-node@820762786026740c76f36085b0efc47a31fe5020 # v7.0.0        with:          node-version: '20'
      - run: npm ci        # <- 47 seconds, every single time      - run: npm run build      - run: npm test
After (with cache)
name: CIon: [push]
permissions: {}
jobs:  build:    runs-on: ubuntu-24.04    permissions:      contents: read    steps:      - uses: actions/checkout@3d3c42e5aac5ba805825da76410c181273ba90b1 # v7.0.1        with:          persist-credentials: false
      - uses: actions/setup-node@820762786026740c76f36085b0efc47a31fe5020 # v7.0.0        with:          node-version: '20'          cache: 'npm'     # <- That is all! One line.
      - run: npm ci        # <- 2 seconds if the cache exists      - run: npm run build      - run: npm test
The cache: 'npm' line does all the work:
- It looks for an existing cache
- If it finds one, it restores the files
- At the end of the job, it saves the cache for next time
Checking that it works
Once you have added cache: 'npm', run two consecutive workflows. In the logs of
the second one, you should see:
Run actions/setup-node@49933ea5288caeca8642d1e84afbd3f7d6820020 Cache hit occurred on the primary key: node-cache-Linux-npm-d5ea0750...The Cache hit message confirms the cache was used. If you see Cache miss, that is normal on the first run: the cache does not exist yet.
How does the cache know what to keep?
You may be wondering: "how does GitHub know that my dependencies have not changed?"
The answer holds in one word: the hash.
What is a hash?
A hash is the fingerprint of a file. If the file changes, even by a comma, the hash changes completely.
package-lock.json (version 1) -> Hash: abc123package-lock.json (version 2) -> Hash: xyz789 (completely different!)When you use cache: 'npm', GitHub computes the hash of your package-lock.json
file. That hash becomes the label of the cache.
Why it is clever
- Monday: you push a commit, hash =
abc123, cache created - Tuesday: a new commit, hash =
abc123(identical!) - GitHub says: "I already have a cache for
abc123, I reuse it" - Result: cache hit, restored in 3 seconds
- Monday: hash =
abc123, cache created - Tuesday: you add
lodash, hash =xyz789(different!) - GitHub says: "I have no cache for
xyz789, I download" - At the end: a new cache is created under the
xyz789label - Wednesday: hash =
xyz789, cache hit!
The system is automatic: if your dependencies change, the cache is renewed. If they do not, the cache is reused.
Why package-lock.json and not package.json?
That is a frequent question. The answer is simple:
| File | Content | Example |
|---|---|---|
package.json | Version ranges | "lodash": "^4.17.0" (can be 4.17.0, 4.17.1, 4.18.0 and so on) |
package-lock.json | Exact versions | "lodash": "4.17.21" (always that precise version) |
If you use package.json, the hash can stay identical while the real versions
have changed. You then risk restoring a cache that is incompatible with your
current dependencies.
The lock file guarantees that the cache matches exactly what will be installed.
The cache key: the label on your fridge
When you use cache: 'npm', GitHub automatically creates a cache key. That
key is like the label on a box in the fridge: it says what is inside.
Anatomy of a key
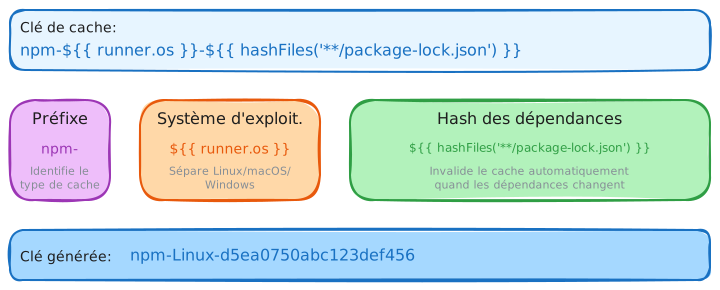
A typical key looks like this:
npm-Linux-d5ea0750abc123def456│ │ └── Hash of package-lock.json│ └── Operating system└── Cache type (npm, pip, maven and so on)Why those three parts?
| Part | Role | Example |
|---|---|---|
| Prefix | Avoids collisions between cache types | npm- vs pip- |
| OS | Compiled dependencies differ per OS | Linux vs Windows |
| Hash | Identifies the exact version of the dependencies | Changes when the lockfile changes |
What happens when the key does not match?
Imagine you add a new dependency. The hash changes. GitHub looks for a cache under the new key, and finds nothing.
That is where the restore-keys (fallback keys) come in.
key: npm-Linux-xyz789 # The exact key (new)restore-keys: | npm-Linux- # Fallback: any npm cache on Linux npm- # Last resort: any npm cache-
Exact lookup
GitHub looks for
npm-Linux-xyz789. Not found? On to the next step. -
Prefix lookup
GitHub looks for a cache starting with
npm-Linux-. It findsnpm-Linux-abc123(the old cache). It restores it. -
Partial install
npm ciruns. 95 % of the packages are already there (from the old cache). Only the new dependency is downloaded. -
A new cache
At the end, GitHub saves the new cache under the
npm-Linux-xyz789key.
Result: instead of downloading everything (47 seconds), you only download the difference (5 seconds).
Advanced configuration: taking control
The cache: 'npm' method is magical, but sometimes you need more control. That
is where the actions/cache action comes in.
When should you use actions/cache?
The cache: 'npm' line is enough for the dependencies, but that is all it knows
how to cache. As soon as you want to cache something else (a build cache,
several paths, a custom key), you have to move to the actions/cache action. The
table below tells you which of the two methods to pick depending on the need.
| Situation | Solution |
|---|---|
| Basic dependency cache | cache: 'npm' (simple) |
| Build cache (Next.js, Webpack and so on) | actions/cache (advanced) |
| Several paths to cache | actions/cache (advanced) |
| A custom key | actions/cache (advanced) |
Example: caching the Next.js build
Next.js stores its build cache in .next/cache. Without that cache, the build
can take 2 minutes. With it, it takes 30 seconds.
name: CI with a build cache
on: [push]
permissions: {}
jobs:  build:    runs-on: ubuntu-24.04    permissions:      contents: read    steps:      - uses: actions/checkout@11bd71901bbe5b1630ceea73d27597364c9af683 # v4.2.2        with:          persist-credentials: false
      # Dependency cache (the simple method)      - uses: actions/setup-node@49933ea5288caeca8642d1e84afbd3f7d6820020 # v4.4.0        with:          node-version: '20'          cache: 'npm'
      # Next.js build cache (the advanced method)      - name: Cache the Next.js build        uses: actions/cache@5a3ec84eff668545956fd18022155c47e93e2684 # v4.2.3        with:          path: .next/cache          key: nextjs-${{ runner.os }}-${{ hashFiles('**/package-lock.json') }}-${{ hashFiles('src/**') }}          restore-keys: |            nextjs-${{ runner.os }}-${{ hashFiles('**/package-lock.json') }}-            nextjs-${{ runner.os }}-
      - run: npm ci      - run: npm run build   # <- 30s instead of 2 min!      - run: npm test
Let us break that key apart:
nextjs-${{ runner.os }}-${{ hashFiles('**/package-lock.json') }}-${{ hashFiles('src/**') }}│ │ │ ││ │ │ └── Changes when the source code changes│ │ └── Changes when the dependencies change│ └── Linux, macOS or Windows└── Prefix identifying this cacheThe cache is invalidated if:
- You change operating system
- You change the dependencies
- You change the source code
That is logical: the build depends on those three things.
Example: caching several paths
You can cache several folders in a single entry:
- uses: actions/cache@55cc8345863c7cc4c66a329aec7e433d2d1c52a9 # v6.1.0 with: path: | ~/.npm .next/cache node_modules/.cache key: all-caches-${{ runner.os }}-${{ hashFiles('**/package-lock.json') }}What you should cache (and what you should not)
Cache this: the dependencies
The best candidate for the cache is the downloaded dependencies: they rarely
change and they weigh a lot. The "What to cache" column gives the global cache
path of each ecosystem, not the local install folder: it is that global
directory you want to target, because it is more reliable and more portable than
node_modules.
| Language | What to cache | Why |
|---|---|---|
| Node.js | ~/.npm | The global npm cache, works everywhere |
| Python | ~/.cache/pip | The packages downloaded by pip |
| Java | ~/.m2/repository | The Maven artefacts |
| Go | ~/go/pkg/mod | The Go modules |
| Rust | ~/.cargo | The Cargo crates |
Cache this too: the build outputs
Caching the dependencies avoids downloading them again; caching the build output avoids recompiling, which often pays off much more. The "Typical gain" column gives an indicative range, measured on real projects: it depends heavily on the size of your code, so take it as an order of magnitude, not as a promise.
| Tool | What to cache | Typical gain |
|---|---|---|
| Next.js | .next/cache | 50-80 % |
| Webpack | node_modules/.cache | 40-60 % |
| Gradle | ~/.gradle/caches | 50-70 % |
| Rust | target/ | 60-80 % |
What you must NOT cache
| Do not cache | Why |
|---|---|
node_modules directly | Fragile, depends on the exact OS |
| Secrets, tokens | The cache is readable from PRs |
| Large files that are never reused | Wastes space (10 GB limit) |
| Executable code | A security risk (cache poisoning) |
Security: who can reach my cache?
The cache is not shared just any old way. GitHub applies strict isolation rules.
The access rules
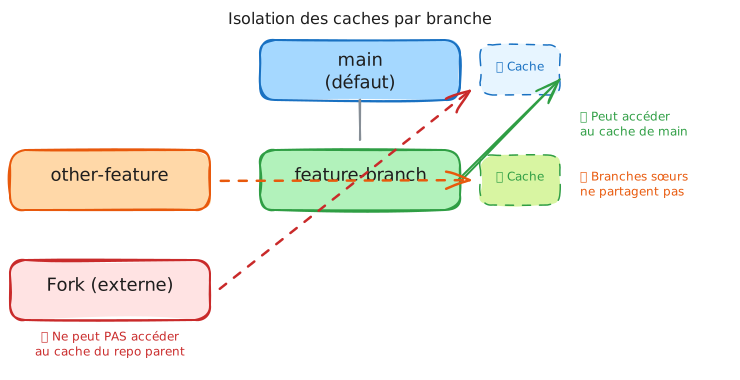
| From | Can reach the cache of | Allowed? |
|---|---|---|
A feature branch | main (the default branch) | Yes |
The feature-a branch | feature-b (a sibling branch) | No |
| An external fork | The parent repository | No |
| A PR | The target branch | Yes |
Why those restrictions?
Imagine an attacker forks your project. If they could write into your cache, they
could inject malicious code there. On the next build on main, that code would
run with access to your secrets.
The restrictions prevent that scenario: forks cannot touch the cache of the parent repository.
To harden your workflows further, also think about pinning your actions by SHA.
The cache poisoning risk
Limits and quotas
What you have to know
Two limits shape your cache strategy: the total quota of 10 GB per repository and the 7-day retention. The first one explains the automatic purge described just after; the second one means that a cache on a quiet branch eventually disappears on its own. Remember those two values, the other rows are guardrails you will rarely reach.
| Limit | Value | What it means |
|---|---|---|
| Size per entry | 10 GB | A single cache cannot exceed 10 GB |
| Total size | 10 GB | Every cache of the repository combined |
| Retention | 7 days | The cache is removed if it is not used for 7 days |
| Key length | 512 characters | Watch out for overly complex keys |
When the cache is full
If you go past 10 GB, GitHub removes the oldest caches (the ones unused for the longest time) until it is back under the limit.
A potential problem: if all your caches are large and used regularly, you can enter a create-and-delete cycle called cache thrashing. Every run creates a cache that evicts the previous one.
Fixes:
- Cache less (only what is needed)
- Ask for a quota increase (enterprises)
- Watch it with
gh cache list
Debugging when it does not work
The cache is never used
Symptom: you always see "Cache miss" in the logs.
Possible causes:
-
The key changes on every run
# ❌ Bad: github.sha changes on every commitkey: cache-${{ github.sha }}# ✅ Good: only changes when the dependencies changekey: cache-${{ hashFiles('**/package-lock.json') }} -
The hashed file does not exist
# ❌ The file does not exist -> empty hash -> always a different keykey: cache-${{ hashFiles('package-lock.json') }}# ✅ A glob pattern that finds the filekey: cache-${{ hashFiles('**/package-lock.json') }} -
No restore-keys
Without restore-keys, the slightest change means a complete cache miss.
How to see what is going on
Add a debugging step:
- name: Debug the cache run: | echo "Computed key: npm-${{ runner.os }}-${{ hashFiles('**/package-lock.json') }}" echo "Does the file exist?" ls -la package-lock.json || echo "File not found!"Listing and deleting the caches
The GitHub CLI lets you manage your caches:
# See every cache of the repositorygh cache list
# Delete one specific cachegh cache delete "npm-Linux-abc123"
# Delete everything (useful to start from scratch)gh cache delete --all
A complete annotated workflow
Here is a production-ready workflow with every good practice:
name: Production CI
on:  push:    branches: [main]  pull_request:    branches: [main]
# No rights by default: the job asks for the minimum (security)permissions: {}
jobs:  build:    runs-on: ubuntu-24.04    permissions:      contents: read
    steps:      # 1. Fetch the code      - name: Checkout        uses: actions/checkout@3d3c42e5aac5ba805825da76410c181273ba90b1 # v7.0.1        with:          persist-credentials: false
      # 2. Set up Node.js with the dependency cache      - name: Setup Node.js        uses: actions/setup-node@820762786026740c76f36085b0efc47a31fe5020 # v7.0.0        with:          node-version: '20'          cache: 'npm'          # Equivalent to:          # - Look for a cache under the key npm-Linux-<hash of package-lock.json>          # - Restore ~/.npm if found          # - Save ~/.npm at the end
      # 3. Next.js build cache (optional but recommended)      - name: Cache the Next.js build        uses: actions/cache@55cc8345863c7cc4c66a329aec7e433d2d1c52a9 # v6.1.0        with:          path: .next/cache          key: nextjs-${{ runner.os }}-${{ hashFiles('**/package-lock.json') }}-${{ hashFiles('src/**', 'app/**') }}          restore-keys: |            nextjs-${{ runner.os }}-${{ hashFiles('**/package-lock.json') }}-            nextjs-${{ runner.os }}-
      # 4. Install the dependencies      # - With a cache hit: around 2 seconds      # - Without a cache: around 45 seconds      - name: Install dependencies        run: npm ci
      # 5. Build      # - With the build cache: around 30 seconds      # - Without a cache: around 2 minutes      - name: Build        run: npm run build
      # 6. Tests      - name: Test        run: npm test
Adapting it per ecosystem
The principles of this page hold for every package manager, but each one puts its
files elsewhere and reacts differently to a badly chosen key. Three companion
guides detail the most common cases, with the exact paths to put in path: and
the traps specific to each tool:
- Python cache: adapting these keys to pip, Poetry and uv.
- Node.js cache: npm, yarn and pnpm, including the trap of caching
node_modulesas it is. - Java cache: Maven and Gradle, where the cache weighs the most and pays off the most.
Check your understanding
Make sure the essentials of this guide are yours. The questions only cover what was explained here.
Knowledge check
Check what you have learned with this interactive quiz
How it works
- The timer starts when you click Start
- Multiple choice, true/false and short answer questions
- You can move between questions
- Detailed results are shown at the end
Starts the quiz and the timer
Review
(0/0)Skills profile
What to do next
Resources to go further
Hints before you try again?
A new full quiz with random questions
Work again only on the questions you missed
Key points
-
One line is enough to start
Add
cache: 'npm'(orpip,mavenand so on) to yoursetup-*action. That is all. You have just saved 30 to 60 seconds per run. -
The lockfile hash is the key
The cache is identified by the hash of your lock file (
package-lock.json,poetry.lockand so on). If the file does not change, the cache is reused. -
The restore-keys are your safety net
Even when the exact key does not exist, the restore-keys let you recover a partial cache. Always configure them.
-
Cache the global, not the local
Prefer
~/.npmtonode_modules. It is more robust and more secure. -
The cache is isolated per branch
Feature branches can read the cache of
main, but forks cannot reach the cache of the parent repository. -
10 GB maximum, 7 days of retention
Watch your usage with
gh cache list. Only cache what is needed. -
Check the logs
Look for "Cache hit" or "Cache miss" to confirm the cache is working.
Next steps
- Concurrency: preventing two runs of the same branch from fighting over the same key.
- Runners: introduction: what the choice of machine changes for the cache, between a fresh VM on every job and a persistent disk.
- Ephemeral runners: the case where the local cache disappears by design, and what replaces it.